OSHA says that an estimated 5 million workers are required to wear respirators in 1.3 million workplaces throughout the United States. Respirators protect workers against insufficient oxygen environments, harmful dusts, fogs, smokes, mists, gases, vapors, and sprays. These hazards may cause cancer, lung impairment, other diseases, or death. To keep out harmful vapors, gases, and particulates, respirators must fit properly. In order to ensure proper fit, OSHA requires fit testing before initial use and annually thereafter for all respirators that rely on a mask-to-face seal. Fit testing is the best way to make sure that selected respirators properly fit the faces of your employees and provide them with maximum protection from airborne contaminants. In today’s training session, we’ll discuss the different fit testing methods that are approved by OSHA.
Table of Contents
Session Objectives
The main objective of this session is to review respirator fit test options and procedures. By the time the session is over, you should be able to:
- Help employees select, assess comfort, and fit a respirator;
- Teach workers to perform positive and negative seal checks; and
- Understand qualitative and quantitative fit test procedures.
Prequiz: Which Statement Is True?
Before we begin discussing respirator fit testing, let’s see what you already know about this important safety topic. Read each of the statements on the screen and decide if its True or False.
- Let’s continue with the session, where you’ll learn the reason behind that answer as well as a whole lot more about respirator fit testing.
Respirator Selection
The first step in properly fitting a respirator is the selection process. A respirator should be selected to provide maximum protection against hazards and to provide the best fit. Initially employees should be shown how to:
- Choose from among available models and sizes;
- Try on respirators to find one with a good fit;
- Choose the respirator that gives the best fit; and
- Become familiar with the respirator by wearing it for at least 5 minutes to assess comfort.
Are you familiar with the different types of respirators we use in the workplace to protect employees against respiratory hazards? You should be.
Comfort Assessment
Comfort is a very important issue, since employees may need to wear a respirator for long periods while working. To help employees assess comfort, review these key points with them.
- The position of the mask on the nose is very important. Some masks fit better on protruding noses, and others fit better on flat noses.
- There has to be room for eye protection for half-mask respirators. Goggles should fit comfortably and snuggly while wearing the respirator, otherwise they may not provide adequate protection.
- There also has to be room for the employee to talk while wearing the respirator. Workers should be able to talk easily and comfortably while wearing a respirator, or it isn’t a good fit.
- Finally, workers need to check the position of the mask on the face and cheeks. Respirators should be snug but not uncomfortably tight against the face and cheeks.
Think about these important points when helping employees try on respirators to find a comfortable fit.
Respirator Fit
Next, employees have to use the criteria you see on the screen to determine if the respirator fits well. To evaluate a respirator’s fit and position on the face, employees should stand in front of a mirror.
- The chin should fit properly into the respirator.
- Strap tension should be adequate but not overly tightened.
- The respirator should fit comfortably across the bridge of the nose.
- The respirator should be big enough so that it completely and comfortably spans the distance from the nose to the chin.
- Finally, when the respirator is in place and adjusted, have employees shake their heads back and forth to make sure the respirator doesn’t slip.
Remember these five fit requirements the next time you help employees check a respirator to see if they have a good fit.
Positive Pressure Seal Check
The next step in making sure that a respirator fits properly to provide protection and prevent leaks is to perform positive and negative pressure seal checks. OSHA explains the process in Appendix B of the respiratory protection standard. Seal checks must be performed each time a respirator is put on and before fit testing. Straps must be adequately tightened to provide a proper seal.
- To perform a positive pressure seal check, employees should close off or cover the exhalation valve. Some respirators might require the user to remove the exhalation valve cover in order to adequately close or cover the valve.
- Next, employees must gently exhale into the respirator.
- The respirator seal is considered adequate if a slight positive pressure can be built up and the face piece slightly inflates.
- If there is no evidence of outward leakage, such as feeling air pass between the respirator and the cheek, nose, or chin, the seal is adequate.
Negative Pressure Seal Check
Now here’s how to perform a negative pressure seal check.
- Employees should begin by closing off or covering the inlet opening of the cartridges or canister by covering it with the palm of the hands or by replacing the filter seals. Some respirators might require removing the cartridges in order to adequately close up or cover the inlet. Another option is to cover the cartridges with thin latex or nitrile gloves.
- The next step is to gently inhale so that the respirator collapses slightly. Employees should hold their breath for 10 seconds.
- The respirator seal is considered adequate if the face piece remains slightly deflated for the 10 seconds that the breath is being held.
- If there is no evidence of inward leakage, the respirator seal is good, and the employee is ready to proceed with the fit test.
Make sure you know how to perform positive and negative pressure seal checks so that you can teach these important safety procedures to your employees.
Fit Test Options
All respirators that rely on a mask-to-face seal must be checked with either a qualitative or quantitative fit test to determine whether the respirator provides an acceptable fit to the user.
- The quantitative test uses instruments to measure face seal leakage.
- Qualitative fit test procedures rely on a subjective sensation—smell, taste, or irritation—of the user to a particular test agent.
Relative workplace exposure level determines what constitutes an acceptable fit and which fit test procedure is required. OSHA says you can use either a quantitative or a qualitative fit test procedure for exposure levels less than 10 times the regulatory occupational exposure limit. If the exposure level is greater than 10 times the occupational exposure limit, you have to use a quantitative fit test procedure.
Fit testing of tight-fitting atmosphere-supplying respirators and tight-fitting powered air-purifying respirators is accomplished by performing quantitative or qualitative fit testing in the negative pressure mode.
For example, OSHA says you can use either a qualitative or a quantitative fit test procedure for negative pressure air-purifying respirators at exposure levels less than 10 times the regulatory occupational exposure limit. If the exposure level is greater than 10 times the occupational exposure limit, you have to use a quantitative fit test procedure for such respirators.
Either quantitative or qualitative fit testing may be used for tight-fitting positive pressure atmosphere-supplying and powered air-purifying respirators.
Test Exercises
For qualitative tests and some quantitative tests, workers must perform a series of exercises to test respirator fit. Each exercise, except for the grimace, must be done for 1 minute. The grimace is only 15 seconds.
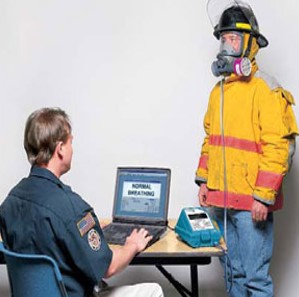
- The normal breathing exercise is done in a standing position and involves normal breaths.
- Then the employee takes slow deep breaths.
- The next exercise is turning the head from side to side. The employee must hold the head at each extreme momentarily and inhale.
- Then the worker moves the head slowly up and down, inhaling in each position.
- The fifth exercise requires the employee to talk out loud. Workers can read from a prepared text, count backwards from a hundred, or anything else that will keep them talking continuously for 1 minute.
- The next exercise, the grimace, applies only to quantitative tests, not qualitative tests.
- The bend over exercise requires employees to bend at the waist as if trying to touch their toes. Jogging in place for 1 minute may be substituted in test environments like shroud units that don’t permit bending over.
- Finally, the worker resumes normal breathing.
Odor Threshold Screen: Isoamyl Acetate
- The first method for qualitative fit testing we’re going to discuss is the isoamyl acetate test. The test begins with an odor threshold screening to check employees’ sense of smell without a respirator on.
- To conduct the odor threshold screening, give the employee the following instructions: “The purpose of this screening is to see if you can smell banana oil—properly known as isoamyl acetate—at low concentration. The two bottles in front of you contain water. One of these bottles also contains a small amount of banana oil. Be sure the covers are on tight, then shake each bottle for 2 seconds. Unscrew each bottle, one at a time, and sniff. Indicate to me which bottle contains the banana oil.”
If employees can’t correctly identify the bottle with the banana oil, you can’t use the isoamyl acetate fit test with them. You have to use one of the other qualitative fit testing methods we’ll talk about a little later in the session, or use a quantitative fit test.
Employees who can correctly identify the banana oil may proceed with the isoamyl acetate fit test.
Isoamyl Acetate Fit Test
The fit test chamber is a clear 55-gallon drum liner suspended inverted over a 2-foot-diameter frame so that the top of the chamber is about 6 inches above the employee’s head. A small hook is attached inside the top center of the chamber to hold the test swab.
- Wearing a respirator, the employee enters the test chamber.
- He or she hangs a test swab that has been wet with 0.75 millileters of pure isoamyl acetate.
- Then the employee waits 2 minutes for the concentration of isoamyl acetate to stabilize.
- Then the employee performs the fit test exercises we described earlier.
- If at any time during the test the employee smells the banana oil odor, the test is failed. The employee must quickly exit the test chamber.
- If the employee does not smell any odor, the respirator passes the fit test.
The efficiency of the test procedure is demonstrated by having the employee break the respirator face seal and take a breath before exiting the chamber. The employee should be able to detect the smell of banana oil when taking this breath.
Taste Threshold Screen: Saccharin/BitrexTM
- Another qualitative fit test method is a taste test using either saccharin or Bitrex.
- As with the banana oil test, this fit test begins with a threshold screening to determine if employees can detect the taste of saccharin or Bitrex without a respirator.
During the screening as well as during the fit test, employees wear an enclosure around the head and shoulders that is approximately 12 inches in diameter by 14 inches tall. At least the front portion of the enclosure must be see-through, and the enclosure must allow free movement of the head. The enclosure has a ¾-inch hole in front of the test subject’s nose and mouth to accommodate the nebulizer nozzle.
Once employees have the enclosure on, instruct them to tell you when they detect a taste—sweet for saccharin or bitter for Bitrex.
Then you spray 10 squeezes of the solution into the enclosure, directing the nozzle away from the nose and mouth. If the employee reports a taste, the screening is completed. If not, you do another 10 squeezes. Be sure to note the total number of squeezes required to elicit a taste response.
If employees can’t taste anything after 30 squeezes, you can’t use the saccharin or Bitrex fit test with them. You have to use another fit testing method.
Saccharin/Bitrex Fit Test
Employees may not eat, drink—except for water—smoke, or chew gum for 15 minutes before this test.
- The fit test begins with employees putting on a respirator and then donning the enclosure.
- Employees breathe through the mouth with the tongue extended and are told to report when they taste the sweet or bitter flavor, depending on whether you’re using saccharin or Bitrex.
- Then you spray the solution into the enclosure just as in the threshold screening, using the same number of squeezes—10, 20, or 30—that it took during the screening to detect a taste.
- Then the employee performs the fit test exercises while you spray one-half the original number of squeezes—5, 10, or 15—into the enclosure every 30 seconds.
- If the employee detects the taste, the test is failed. A different respirator will be used, and the entire test procedure is repeated.
- If the employee does not detect any taste, the test is passed.
Irritant Smoke Fit Test
- Another qualitative testing method is the irritant smoke fit test. In this test, irritating materials are released in smoke to detect leakage into the respirator. No enclosure is required for this test—just a respirator. However, the respirator must be equipped with a high-efficiency HEPA or series P100 filter.
- Since the smoke can be irritating to the eyes, nasal passages, and lungs, you have to be careful to minimize employee exposure to the smoke.
- The smoke is produced by a stannic chloride ventilation smoke tube, which must be broken at both ends during the test. One end is attached to a low-flow air pump set to deliver 200 milliliters of smoke per minute. An aspirator squeeze bulb can also be used. The other end of the tube is covered with a short piece of tubing to prevent injury from the jagged broken edge.
- The employee will be allowed to smell a weak concentration of the stannic chloride smoke without a respirator before the test to make sure he or she knows what to expect, and to make sure that the person can indeed detect the irritating properties of the smoke.
- An employee who has no reaction to the smoke during the weak-concentration test cannot be fit tested with irritant smoke. Another method must be used.
Irritant Smoke Fit Test
The irritant smoke fit test follows a simple procedure.
- Employees don a respirator equipped with an appropriate filter.
- They are instructed to close their eyes.
- Then you direct a stream of irritant smoke from the tube toward the face seal area using the pump or squeeze bulb. Begin at least 12 inches from the face piece and move the smoke stream around the whole perimeter of the mask, moving within 6 inches of the respirator.
- If employees have not detected any irritant, have them proceed with the test exercises.
- If employees detect irritant smoke at any time during the test, the test is failed. Note that response to the irritant could be involuntary, such as a cough.
- If employees complete the exercises without detecting any irritant, the test is passed. Employees must then remove the respirator and be given a second sensitivity check with smoke from the same smoke tube used in the test. This is to make sure they still react to the smoke. Failure to do so voids the test. A response to the irritant indicates that the test was successful and the respirator passes the fit test.
Respirator Fit Testing
Let’s take a couple of minutes now to check your memory of the information we’ve discussed about seal checks and qualitative fit testing. On the left side of the screen is a list of procedures. On the right side of the screen is a list of items related to those procedures. Your job is to match the items on the right side of the screen to the procedures on the left.
How did you do? Did you get all the matches right?
Respirator Fit Testing: Review
Now it’s time to ask yourself if you understand the information presented so far. For example, do you understand what we’ve said about:
- Respirator selection?
- Comfort assessment?
- Proper fit?
- Positive and negative seal checks?
- Qualitative fit testing procedures?
It’s important for you to understand all this information so that you can help employees select a respirator that fits well so that you can teach them how to perform seal checks and so that you can perform qualitative fit tests.
Let’s continue now to the next slide and talk about quantitative fit tests.
Quantitative Fit Test Options
OSHA approves the following quantitative fit test methods:
- Generated aerosol fit testing in a test chamber, using test instruments and a nonhazardous aerosol such as corn oil, sodium chloride, polyethylene glycol 400, or di-2-ethyl hexyl sebacate; • Ambient aerosol fit testing, using ambient aerosol as the test agent and quantifying the respirator fit with a condensation nuclei counter;
- Controlled negative pressure, or CNP, testing, using appropriate instrumentation to measure the volumetric leak rate of a face piece to quantify the respirator fit; or
- CNP REDON, that is redonning the respirator, using the same equipment as the CNP test but different test procedures.
No matter which method is used, the people administering quantitative fit tests must be able to calibrate equipment, perform tests properly, recognize invalid tests, calculate fit factors correctly, and ensure that test equipment is in good working order.
Quantitative fit test equipment must be kept clean, maintained, and calibrated according to the manufacturer’s instructions so that it operates at the parameters for which it was designed.
Generated Aerosol Fit Test Requirements
There are several basic requirements for generated aerosol fit tests.
- The first is that the test chamber must be large enough to permit employees to freely perform all the test exercises without disturbing the test agent concentration or measurement instruments. The test chamber must also be equipped and constructed so that the test agent is effectively isolated from the air outside the chamber, yet uniform in concentration throughout the chamber.
- When testing air-purifying respirators, the normal filter or cartridge must be replaced with a high-efficiency HEPA or P100 series filter.
- The air sampling port on the test respirator must be placed so that there’s no leakage around the port, a free flow of air is allowed into the sampling line, and there is no interference with the fit or performance of the respirator. The in-mask probe must draw the sample air from the employee’s breathing zone, midway between the nose and mouth, and must extend at least one-quarter inch into the face piece cavity.
- The equipment generating the test atmosphere must maintain the concentration of test agent constant during the test.
- And test respirators must be maintained in good working order and be inspected regularly for deficiencies.
Generated Aerosol Fit Test Procedure
- The generated aerosol fit test begins with the employee donning the test respirator. The employee must adjust the straps to give a comfortable fit without assistance. The respirator cannot be readjusted once the test begins.
- Then the employee performs a positive and negative pressure seal check.
- Before the employee enters the test chamber, a reasonably stable test agent concentration is measured in the chamber.
- The employee enters the test chamber.
- Immediately after the employee enters the test chamber, the test agent concentration inside the respirator is measured to ensure that peak penetration does not exceed 5 percent for a half-mask or 1 percent for a full face piece respirator.
- Then the employee performs all the test exercises we discussed earlier in the session.
– The test must be terminated whenever a single peak penetration exceeds 5 percent for half-masks and 1 percent for full face piece respirators.
– After a failure, the employee must be refitted and retested. If the peak penetration remains below 5 percent for half-masks and below 1 percent for full face piece respirator, the test is passed.
Ambient Aerosol Quantitative Fit Test
For the ambient aerosol fit test, a condensation nuclei counter, or Portacount™, is used to calculate the respirator fit factor.
- The test begins with an inspection of the respirator to make sure the sampling probe and line are properly attached to the face piece and that the respirator is fitted with a particulate filter capable of preventing significant penetration by the ambient particles used for the test.
- Then the employee must wear the respirator for 5 minutes before the test begins to purge ambient particles trapped inside the respirator. This also gives the employee the chance to make sure the fit is comfortable. During this time the employee also performs seal checks.
- Next follow the manufacturer’s instructions for operating the Portacount and proceed with the fit test.
- Have the employee perform the test exercises.
- The Portacount will automatically calculate the overall fit factor for the entire set of exercises. The overall fit factor is what counts. A pass/fail message will indicate whether the test was successful. If the message reads pass, the test is over.
CNP Fit Test Requirements
- The CNP quantitative fit test provides an alternative to aerosol methods. The CNP test involves exhausting air from a temporarily sealed respirator face piece. The rate of air exhaust is controlled so that a constant negative pressure is maintained in the respirator during the fit test.
- With pressure held constant, air flow out of the respirator is equal to air flow into the respirator. Therefore, the test yields a direct measure of leakage air flow into the respirator.
- The CNP instrument manufacturer provides attachments, or sampling manifolds, that replace the filter cartridges on the respirator to permit fit testing in the employee’s own respirator.
- OSHA requires that the person conducting the CNP fit test must be thoroughly trained to perform this test.
CNP Fit Test Procedure
- To perform the CNP fit test, the employee dons the respirator.
- The testing equipment is activated.
- The worker then performs all of the test exercises.
- During sampling for each exercise, the employee is instructed to hold his or her breath for 10 seconds, after which the air pump removes air from the respirator face piece at a preselected constant pressure. Instantaneous feedback in the form of real-time pressure trace of the inmask pressure is provided and used to determine the validity of the test.
- To pass the test, a minimum fit factor of 100 is necessary for a half-mask respirator and a minimum of 500 is required for a full face piece respirator.
- Less that 100 and 500, respectively, means the respirator fails the fit test.
CNP REDON
The last quantitative fit testing method is known as the controlled negative pressure REDON. This test requires three different test exercises followed by two redonnings of the respirator. This test uses the same equipment as the CNP fit test we just described.
- The test begins with employees in a standing position breathing normally without talking for 30 seconds. Then workers hold their breath for 10 seconds during sampling.
- Next workers bend over at the waist for 30 seconds. Still bent over, employees hold their breath for 10 seconds during sampling.
- The third exercise is head shaking. For about 3 seconds, workers shake their head back and forth vigorously while shouting. Then employees face forward and hold their breath for 10 seconds during sampling.
- For the first REDON, employees must remove the respirator, loosen all face piece straps, and then redon the respirator. Once the respirator is on, employees hold their breath for 10 seconds during sampling.
- The second REDON proceeds like the first one.
- At this point, the tester determines the overall fit factor by calculating the mean result of the fit testing exercises and REDONs.
Quantitative Fit Testing: Make the Right Choices
OK, here’s a quiz to see if you can identify the quantitative fit tests as opposed to the qualitative fit tests we talked about earlier in the session. From the list on the screen, determine which is a quantitative test and which is a qualitative test.
- To review quickly, the quantitative fit tests are:
– Generated aerosol;
– Controlled negative pressure, or CNP;
– Ambient aerosol; and
– CNP REDON.
Remember that the relative workplace exposure level determines what constitutes an acceptable fit and which fit test procedure is required. OSHA says you can use either a qualitative or a quantitative fit test procedure for exposure levels less than 10 times the regulatory occupational exposure limit. If the exposure level is greater than 10 times the occupational exposure limit, you must use a quantitative fit test procedure.
Quantitative Fit Testing: Review
Now let’s review quickly to make sure you understand all the information we’ve discussed about quantitative fit tests. Do you understand:
- The generated aerosol fit test procedure?
- The ambient aerosol fit test procedure?
- The CNP fit test procedure?
- The CNP REDON procedure?
It’s important to understand these procedures so that you know how employees may be fit tested using quantitative methods and instrumentation.
Let’s continue to the next slide now and conclude the session with some key points to remember.
Key Points To Remember
Here are the main points to remember from this session on respirator fit testing:
- Respirator fit tests are required to make sure employees are adequately protected from airborne contaminants in the workplace.
- There are a variety of qualitative and quantitative fit tests that may be used.
- OSHA sets mandatory requirements for both qualitative and quantitative fit testing.
- You should understand fit test requirements and procedures.
This concludes the respirator fit testing training session.
